
It’s 9:58 AM. Your CEO has a board meeting at 10:00. You walk into the Zoom Room, tap the controller to join, and… nothing. Black screen. No audio. Or maybe the camera’s on but showing the ceiling. Or everyone sounds like they’re underwater.
Panic sets in.
Here’s the reality: Zoom Rooms break. Not constantly, but enough that you need to know how to fix common problems fast. I’m talking about real fixes you can do in two minutes, not “submit a ticket and wait three days” solutions.
This guide covers the problems I see most often—the ones that happen at the worst possible times—and exactly how to fix them. We’ll start with the quick wins (stuff you can solve in under five minutes) and work up to more complex issues that might need professional help.
Let’s get your room working again.
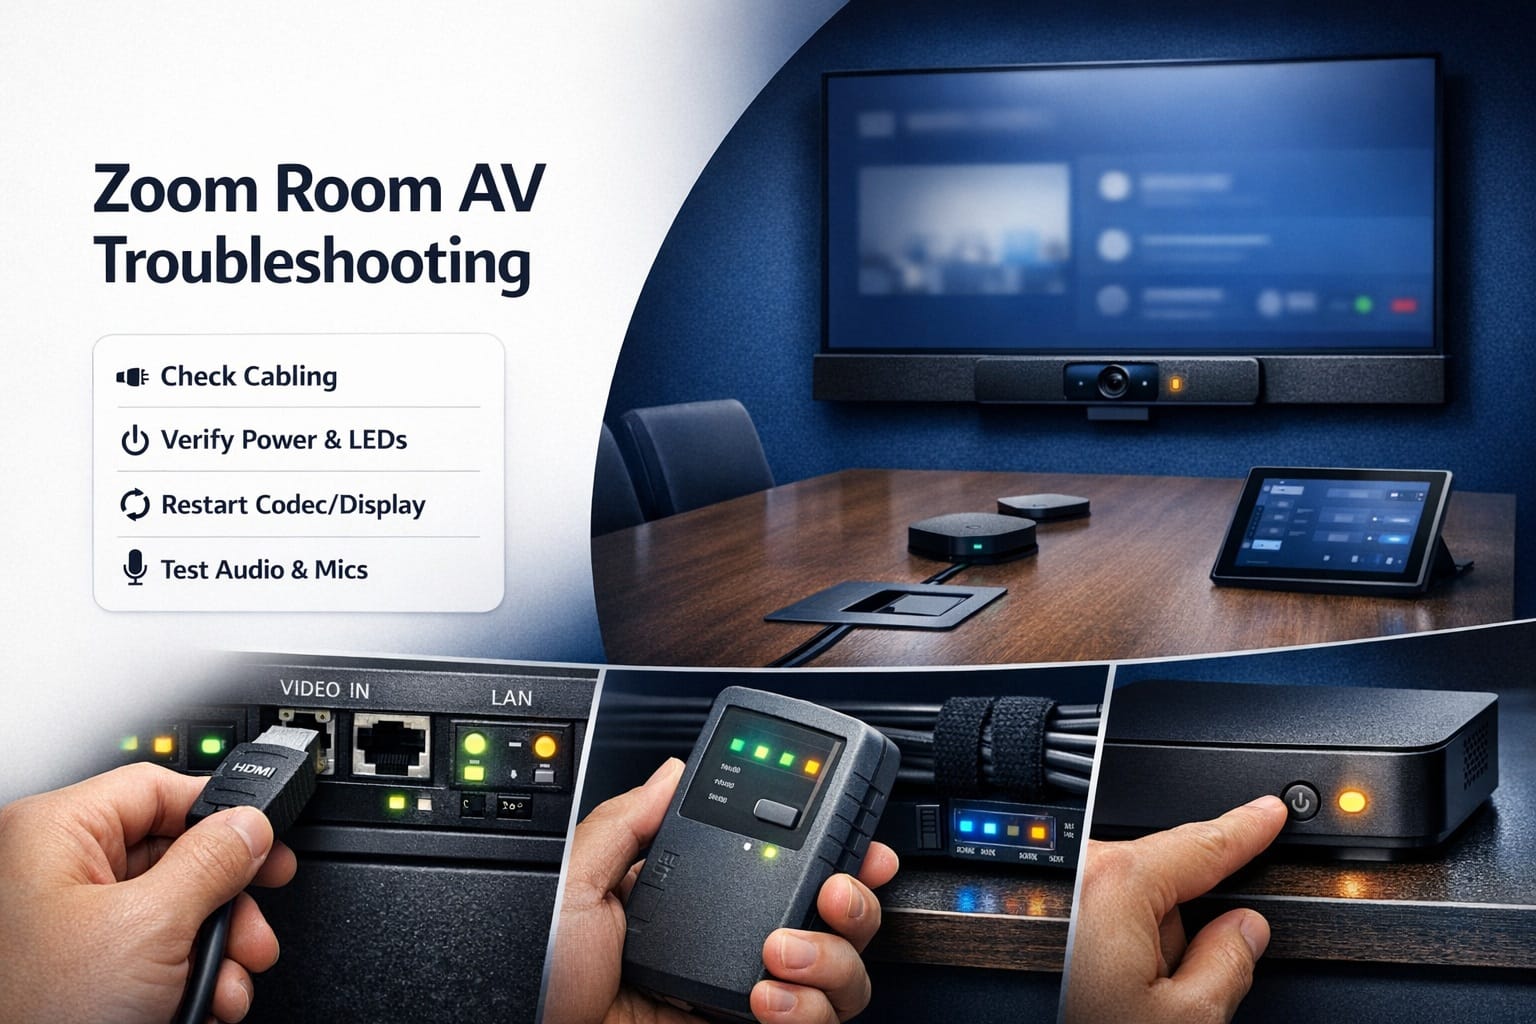
The Universal Fix That Solves 40% of Problems
Before diving into specific issues, try this first. I’m serious—this fixes an absurd number of problems.
The Power Cycle Everything Approach
Turn off the Zoom Room computer, the display, the camera, the controller—everything. Wait 30 seconds. Turn it all back on in this order:
- Network switch (if you have one in the room)
- Display
- Zoom Room computer
- Camera and audio devices
- Touch controller
Why does this work? Because computers are weird and sometimes just need to reset their brains. Connections get stuck. Software hangs. A fresh start clears most of it.
Give the system 2-3 minutes to fully boot and reconnect to everything. Don’t panic if it takes a minute to show the normal Zoom Room interface.
If this fixes your problem, great. If not, keep reading.
Video Problems: When the Display Shows Nothing (or the Wrong Thing)
Display issues are the most visible problems—literally. Here’s how to fix them.
No Video Signal / Black Screen
Check the obvious first: Is the display actually on? Sounds dumb, but I’ve seen people troubleshoot for 10 minutes before realizing the display was in standby mode. Press the power button.
Verify input source: Most displays have multiple HDMI inputs. Make sure it’s set to the correct one. If your Zoom Room is on HDMI 1, but the display is showing HDMI 2, you’ll see nothing.
Most displays have an “input” or “source” button on the remote or on the display itself. Cycle through inputs until you see the Zoom Room interface.
Check cable connections: Wiggle the HDMI cable at both ends—computer and display. Loose connections cause intermittent or no signal. If you can, unplug and firmly reconnect both ends.
Try a different HDMI cable: HDMI cables fail more often than people think. If you have a spare, swap it. Takes 30 seconds and eliminates cable problems.
Display Shows “No Signal” Message
This means the display isn’t receiving anything from the computer.
Verify the computer is actually on: Look for indicator lights on the computer. If it’s a Mac Mini, there should be a small white light. No light = computer is off or dead.
Check if the computer went to sleep: Some Zoom Room computers are configured to never sleep, but settings change. Wake it up—press a key on the keyboard or move the mouse if they’re connected.
Restart just the Zoom Room computer: Leave everything else on. Restart only the computer. This often fixes signal handshake issues between computer and display.
Wrong Resolution or Stretched Image
Access display settings: On Mac, go to System Preferences > Displays. On Windows, right-click desktop > Display Settings.
Set to native resolution: If your display is 1080p, set 1920×1080. If it’s 4K, set 3840×2160. Mismatched resolutions cause stretched or squished images.
Check scaling settings: Make sure scaling is set to 100%. Zoom Rooms don’t need interface scaling that personal computers use.
Camera Shows Wrong Angle or Ceiling
This happens when someone physically moved the camera or adjusted it during a previous meeting.
Manually adjust the camera: If it’s a PTZ (pan-tilt-zoom) camera, it might have physical controls or a remote. Reposition to the correct angle.
Reset camera to home position: Many cameras have a “home” preset. Access camera settings through the Zoom Room interface (if available) or the camera’s web interface to recall the default position.
Check for software framing issues: If you’re using auto-framing, make sure it’s enabled and working correctly. Sometimes auto-framing gets disabled and leaves the camera in a weird position.
Audio Issues: The Most Frustrating Problems
Bad audio kills meetings faster than bad video. Here’s how to fix it.
Nobody Can Hear the Zoom Room
Check mute status: This sounds obvious, but check three places—the Zoom Room interface shows mute status, check the physical microphone (some have mute buttons), and check the touch controller.
Verify correct microphone is selected: Open Zoom Room settings and check which microphone device is active. If you have multiple mics connected, it might be using the wrong one.
Test microphone levels: Speak normally and watch the audio meter in Zoom Room settings. If you see no movement, the mic isn’t picking up audio.
Check microphone power: Active mics need power via USB or phantom power. Make sure USB cables are connected or phantom power is enabled on the audio interface.
Inspect cable connections: For XLR mics, check connections at both the mic and the interface. Loose XLR cables are common culprits.
Remote Participants Can’t Hear Each Other (Echo Issues)
Echo happens when the room’s speakers feed back into the microphones.
Lower speaker volume: Echo gets worse with louder speakers. Reduce volume by 20-30% and test.
Enable echo cancellation: Check Zoom Room audio settings. Echo cancellation should be enabled. If it’s off, turn it on.
Check speaker/mic distance: Speakers too close to microphones cause feedback. If possible, increase distance between speakers and mic pickup zones.
Update audio firmware: Older firmware on audio devices sometimes has poor echo cancellation. Check manufacturer websites for updates.
Audio Cutting In and Out
Network bandwidth issues: Audio dropout often indicates network problems. Run a speed test on the Zoom Room computer. You need consistent 3-5 Mbps minimum.
Check CPU usage: If the computer is maxed out, audio processing suffers. Close unnecessary applications. Restart the computer if CPU is pegged at 100%.
Verify USB cable quality: For USB microphones or cameras with built-in mics, cheap or damaged USB cables cause dropouts. Use quality cables, especially on longer runs.
Test with wired connection: If using WiFi, switch to wired Ethernet if possible. WiFi interference causes intermittent audio problems.
Audio Hum or Buzzing
Ground loop issue: Happens when equipment is on different electrical circuits. Plug everything into the same power strip or circuit if possible.
Use a ground loop isolator: Small devices that break ground loops. Cost $20-50 and solve most hum problems.
Check for interference sources: Fluorescent lights, dimmers, and other electronics near audio cables can cause buzz. Move audio cables away from power cables.
Verify cable shielding: Cheap, unshielded audio cables pick up interference. Use proper shielded cables for all audio connections.
Network and Connectivity Problems
Zoom Rooms need solid network connections. When that fails, everything fails.
“Cannot Connect to Zoom” Error
Check internet connection: Open a web browser on the Zoom Room computer. Try loading a website. If it doesn’t load, the network is down.
Restart network equipment: Power cycle the router and switch. Wait 60 seconds, power back on. Give it 2-3 minutes to fully reconnect.
Verify firewall settings: Zoom requires specific ports open. If your IT recently changed firewall rules, they might be blocking Zoom traffic. Check with IT.
Check Zoom service status: Sometimes Zoom itself has outages. Go to status.zoom.us on another device to verify service is up.
Re-pair the controller: If the controller shows offline, try unpairing and re-pairing it in the Zoom admin portal.
Poor Video Quality / Pixelation
Bandwidth limitation: Run a speed test. 4K video calls need 8+ Mbps. 1080p needs 3+ Mbps. If you’re below this, video quality suffers.
Switch to wired connection: WiFi bandwidth fluctuates. Hardwire the Zoom Room computer if it’s currently on WiFi. This alone often fixes quality issues.
Reduce video resolution: In Zoom Room settings, you can limit outbound video resolution. Dropping from 1080p to 720p might stabilize the connection on limited bandwidth.
Check for network congestion: Other devices or users on the same network streaming or downloading large files? That impacts your Zoom Room. Coordinate heavy network use around important meetings.
Controller Disconnected from Room
Verify controller and computer are on same network: If they’re on different VLANs or subnets, they can’t communicate. Check with IT.
Restart the controller app: Close the Zoom Rooms controller app completely and reopen it. Sometimes the connection just hangs.
Check activation code: In rare cases, the pairing breaks. You might need to re-enter the activation code from the Zoom admin portal.
Update controller software: Outdated controller apps sometimes lose connection. Update to the latest version.
Camera-Specific Issues
Camera problems are common because cameras have multiple connection points that can fail.
Camera Not Detected
Check USB connection: Unplug and reconnect the USB cable at both ends. Try a different USB port on the computer.
Verify power: Some cameras need separate power adapters. Make sure power is connected and the camera has indicator lights showing it’s on.
Check camera selection in settings: Zoom Room might be trying to use a different camera. Go to settings and manually select the correct camera device.
Update camera drivers: Especially on Windows, camera drivers can be outdated. Check manufacturer website for latest drivers.
Camera Image is Dark or Washed Out
Adjust room lighting: Cameras need proper light. Too dark and the image is grainy. Too bright (especially backlighting from windows) and faces are silhouettes. Professional lighting setup and calibration makes a huge difference.
Check camera exposure settings: Many cameras have auto-exposure that can be adjusted. Access camera web interface or settings to tweak exposure compensation.
Clean the lens: Fingerprints, dust, and smudges on the lens reduce image quality. Gently clean with a microfiber cloth.
Close blinds or adjust shade position: Windows behind participants cause backlight problems. Close blinds or reposition seating.
Camera Lag or Choppy Video
USB bandwidth issue: If you have multiple USB devices on the same bus, they compete for bandwidth. Try connecting the camera to a different USB controller.
Computer performance: Check CPU and memory usage. If maxed out, close other applications or restart.
Reduce camera resolution: Lower the camera output resolution in Zoom Room settings. Sending 4K when you only need 1080p wastes bandwidth and processing power.
Check for USB cable length: Standard USB cables max out around 16 feet reliably. Beyond that, you need active USB cables or extenders.
Controller and Touch Panel Problems
The controller is your main interface. When it fails, the room becomes much harder to use.
Controller Unresponsive or Frozen
Force restart the controller: On iPad, press and hold power button until “slide to power off” appears. Slide and wait 30 seconds. Power back on.
Check for iOS/Android updates: Outdated operating systems cause app crashes. Update to latest OS version.
Reinstall Zoom Rooms app: Delete the app completely, restart the device, reinstall from app store. Sometimes the app gets corrupted.
Verify touch calibration: If specific areas don’t respond to touch, the screen might need recalibration. Check device settings.
Can’t Join Scheduled Meetings
Calendar integration broken: Check that calendar sync is still working in Zoom admin portal. OAuth tokens expire and need reauthorization.
Time zone mismatch: Verify the Zoom Room’s time zone matches your actual location and calendar system. Mismatches cause meetings to not appear.
Restart scheduling service: In Zoom admin portal, you can restart the calendar service for the room without affecting the room itself.
Check calendar permissions: The Zoom Room’s calendar account might have lost permissions to read the calendar. Re-grant permissions.
Controller Shows Wrong Information
Clear app cache: In the Zoom Rooms app settings, clear cache and data. Restart the app.
Check Zoom admin portal: Verify room settings in the admin portal match what you expect. Changes in the portal take a few minutes to propagate.
Sign out and sign back in: Completely sign out of the Zoom Rooms app, wait 30 seconds, sign back in.
Display-Related Issues Beyond Basic Video
Displays have their own quirks beyond just showing (or not showing) an image.
Display Won’t Turn On Automatically
Check CEC settings: HDMI-CEC allows the Zoom Room computer to power on/off the display automatically. Verify CEC is enabled in both the display settings and computer settings.
Verify HDMI connection: CEC only works through HDMI. If using other connection types, automatic power control won’t work.
Use a smart power strip: As a workaround, some setups use smart power strips that power everything on together when the master device (computer) powers on.
Display Goes to Sleep During Meetings
Adjust display sleep timer: Access display settings (usually via remote) and disable auto-sleep or set it to maximum time.
Check computer power settings: Make sure the computer isn’t sending sleep signals. Disable display sleep in computer power settings.
Update display firmware: Some displays have buggy firmware that ignores sleep settings. Check manufacturer website for updates.
When to Call for Professional Help
Some problems are beyond quick fixes and need expert intervention.
Signs You Need Professional Support
Consistent problems across multiple meetings: If the same issue happens repeatedly, it’s not a fluke. Something’s misconfigured or failing.
Hardware failure indicators: Burning smells, unusual noises, devices that won’t power on at all—these indicate hardware problems requiring replacement.
Complex network issues: Problems involving VLANs, firewall rules, QoS settings, or enterprise network configuration need IT involvement.
Structural installation problems: Issues related to cable runs, rack organization, or physical installation need professional AV help.
Finding the Right Help
For persistent problems with your Zoom Room installation, professional AV support can diagnose and fix issues that aren’t obvious. They have diagnostic tools, experience with edge cases, and access to resources you don’t.
Whether you’re dealing with small huddle room issues or larger boardroom system failures, specialists who handle commercial installations daily know the solutions.
Preventive Maintenance to Avoid Problems
The best troubleshooting is preventing problems in the first place.
Weekly Checks
Test the room: At least once a week, join a test meeting and verify everything works. Don’t wait until important meetings to discover issues.
Clean camera lenses: Quick wipe with a microfiber cloth keeps video quality high.
Check cable connections: Wiggle cables at connection points to verify they’re secure. Cables work loose over time.
Monthly Maintenance
Update software: Check for Zoom Rooms app updates, controller updates, and firmware updates for cameras and audio devices.
Review settings: Verify room settings haven’t drifted from optimal configuration. Someone might have changed things.
Test all features: Screen sharing, whiteboard, recording—test everything monthly so you know it works.
Quarterly Tasks
Deep clean: Dust accumulates on equipment. Clean displays, cameras, vents on computers and other devices.
Cable inspection: Look for damaged cables, especially where they bend or connect. Replace any showing wear.
Professional calibration: Consider having audio and video professionally recalibrated quarterly for critical rooms.
Platform-Specific Considerations
While this guide focuses on Zoom Rooms, many issues apply to other platforms too.
If you’re running Microsoft Teams Rooms or Google Meet hardware, most AV troubleshooting steps are identical. The underlying hardware and network requirements are similar across platforms.
The main differences are in software settings and where you configure things—Teams admin center vs Zoom admin portal vs Google Workspace admin. But camera not working? Check USB connections. Audio echo? Lower speaker volume. Display black? Check HDMI input. The fixes are universal.
Documentation for Faster Troubleshooting
Keep a troubleshooting log for each room. When problems happen, document:
- What the problem was
- What you tried
- What actually fixed it
- Date and time
Patterns emerge. Maybe the camera disconnects every Tuesday at 3 PM (that’s when cleaning crew unplugs stuff to vacuum). Maybe audio cuts out during heavy network usage times (bandwidth problem).
This log becomes your roadmap to faster fixes and helps you spot recurring issues that need permanent solutions.
The Reality of Conference Room AV
Here’s the honest truth: conference room AV systems are complex. They involve computers, networks, multiple hardware devices, software platforms, and various cables all working together. Something will eventually break.
The difference between chaos and minor inconvenience is knowing how to fix common problems quickly. Most issues—honestly, probably 70-80%—are simple fixes if you know what to check.
The rest? That’s when you need expertise. Don’t feel bad calling for help on complex problems. Even AV professionals occasionally encounter issues that require deep troubleshooting or manufacturer support.
The goal isn’t to become an AV expert yourself. It’s to handle the quick fixes that get your meeting started on time, and know when to escalate for real problems.
Keep this guide handy. Bookmark it. Share it with your team. Because nothing’s worse than panic-troubleshooting in front of waiting executives. With these fixes, you’ll solve most problems in minutes and look like a hero.