
You know what separates a professional Zoom Room from one that looks like someone just threw equipment at a wall? Cable management.
I’ve walked into conference rooms with $30,000 worth of beautiful AV gear completely undermined by cables draped across walls, zip-tied together in visible bundles, or worse, just lying on the floor behind the TV. It looks terrible, creates trip hazards, and makes troubleshooting a nightmare.
Here’s the thing about wiring: it’s not glamorous work. It’s time-consuming, sometimes frustrating, and requires planning that most people skip. But do it right and your Zoom Room looks clean, professional, and actually maintainable. Do it wrong and you’re living with an eyesore or paying someone to redo it later.
This guide walks you through the entire wiring process—from planning cable paths to building equipment racks to hiding every wire so the room looks like magic. Whether you’re DIYing a small huddle room or working with installers on a larger space, this is what you need to know.
Planning Before You Pull a Single Cable
The biggest mistakes happen before anyone touches a wire. Let’s prevent that.
Map Everything First
Don’t start drilling holes or running cables until you know exactly where everything goes.
Create a diagram showing:
- Display location (wall-mounted or on a stand?)
- Camera position (below display, above, on table?)
- Microphone placement (table mics, ceiling mics?)
- Speaker locations (soundbar, in-ceiling, wall-mounted?)
- Controller position (conference table center, wall-mounted near door?)
- Equipment rack or computer location
- Network drop location
Mark where power outlets exist and where you need to add them. Note which walls you can access (exterior walls are harder than interior walls). Identify where ceiling access is available.
This diagram becomes your roadmap. Refer to it constantly during your conference room design and buildout.
Understand Your Cable Types
Different signals need different cables. Mix them up and things don’t work.
HDMI cables: Carry video and audio from sources to displays. For runs over 25 feet, use active HDMI cables or HDBaseT extenders. Standard HDMI doesn’t reliably work past 25-30 feet for 4K signals.
Cat6/Cat6a Ethernet: For network connections and HDBaseT transmission. Always use Cat6 minimum, Cat6a if you’re future-proofing. Don’t use Cat5e—it’s old and doesn’t support modern speeds reliably.
USB cables: Connect cameras and other peripherals to computers. Standard USB has 16-foot limits. Beyond that, you need active USB extension or USB-over-Cat cables.
Audio cables: XLR for professional microphones, speaker wire for passive speakers, sometimes Cat cable for Dante audio networks.
Power cables: Obviously needed everywhere. Plan for AC power at display, equipment rack, table controller, and any active devices.
Calculate Cable Lengths Accurately
Measure actual cable paths, not straight-line distances. Cables go up walls, across ceilings, down walls, with slack at both ends.
Add 20-30% to your measurements for mistakes, adjustments, and service loops. Better to have extra cable than come up 3 feet short mid-install.
For example: if your display is 8 feet from your rack with a cable path that goes up 8 feet to the ceiling, across 10 feet, then down 8 feet to the display, that’s 26 feet of path. Add 30% buffer = 34 feet of cable minimum.
In-Wall Wiring: Doing It Right
Running cables through walls is where installations look professional or amateurish.
Check Building Codes First
You can’t just run any cable through walls. Building codes matter, and violating them creates liability.
Plenum-rated cables are required in spaces used for air circulation (above drop ceilings, in air return ducts). They’re fire-resistant and don’t release toxic fumes when burning. Regular PVC-jacketed cables aren’t allowed in these spaces.
In-wall rated cables (CL2, CL3 ratings) are required for cables inside walls. HDMI cables need to be CL2 or CL3 rated for in-wall installation. Most consumer HDMI cables aren’t.
Pull permits if required in your jurisdiction. Commercial installations almost always need permits. Check with your local building department before starting any professional AV installation work.
Tools You Actually Need
For in-wall work, you need:
- Fish tape or fish sticks (for pulling cables through walls)
- Drill with long bits for wall penetrations
- Stud finder (magnetic or electronic)
- Cable pulling lubricant (seriously, it helps)
- Drywall saw for cutting access holes
- Voltage detector (check for electrical before drilling)
- Headlamp or flashlight
- Drop cloths (drywall dust goes everywhere)
Running Cables Through Walls
Find the path: Use a stud finder to locate studs and avoid drilling into them. Plan cable paths between studs where possible.
Drill entry and exit holes: From the equipment location to the destination, drill holes through top or bottom wall plates to access the wall cavity. Use a long flex bit if going through multiple bays.
Fish the cable: Attach fish tape or sticks through holes, connect cable, pull it through. This is where patience matters—walls fight back sometimes.
Leave service loops: At both ends, leave 3-5 feet of extra cable coiled in the wall or ceiling space. Future you will thank present you when something needs adjustment or replacement.
Use conduit for future flexibility: If you’re doing serious installation, run conduit (usually 1.5-2 inch inner diameter) through walls. Pull current cables through it, but later you can pull new cables without opening walls again. This is standard practice in professional structured cabling installations.
Wall Plate Installation
Terminate wall cables at proper wall plates, not random holes with cables sticking out.
Low-voltage mounting brackets (also called old-work boxes or retrofit brackets) install into drywall without access to wall studs. They’re code-compliant and look clean.
Blank plates with brush inserts work for cables that won’t be connected/disconnected regularly. The brush hides cables while allowing them to pass through.
Keystone wall plates with proper jacks (HDMI, Cat6, USB, etc.) look most professional for connections that’ll be used regularly.
Mount wall plates level and secure. Sloppy wall plates ruin an otherwise clean install.
Cable Management Behind Displays
The area behind wall-mounted displays is where shortcuts become visible disasters.
Recessed Boxes Are Your Friend
Recessed electrical boxes with low-voltage pass-through mount flush in the wall behind the display. Power outlet on one side, cable pass-through on the other. Everything stays hidden behind the display with no visible wires.
These cost $40-$80 and take 30 minutes to install. Worth every penny.
Position the box so it’s hidden behind the display but accessible if you remove the display. Don’t place it where the mounting bracket bolts go.
Cable Raceways When In-Wall Isn’t Possible
Can’t open walls? Cable raceways are the next-best solution.
Surface-mount raceways (like Wiremold) attach to walls and hide cables. They’re visible but way cleaner than exposed cables.
Paint them to match your walls. Unpainted white raceways on colored walls scream “afterthought installation.”
Run raceways vertically behind displays and horizontally at baseboard level where possible. Diagonal raceways look sloppy.
The Power Situation
Never run standard power extension cords through walls—it violates electrical code and is dangerous.
If you need power where it doesn’t exist:
- Have an electrician install a proper outlet
- Use code-compliant in-wall power kits (power inlet behind TV, outlet at equipment location, with proper wiring in between)
- Use furniture-mounted power solutions that don’t require in-wall work
Equipment Rack Setup and Organization
If your Zoom Room has more than a couple components, you need a rack to keep things organized. This is especially important for larger boardroom configurations where multiple systems need integration.
Choosing the Right Rack
Full-height racks (42U, which is about 6 feet tall) are for serious installations with lots of equipment. Probably overkill for most conference rooms.
Half-rack or quarter-rack (12U-24U, roughly 2-3 feet tall) works for typical Zoom Rooms with a computer, maybe a receiver or switcher, patch panel, power conditioning, and network switch.
Wall-mount racks save floor space and can be installed in closets or behind displays where floor racks won’t fit.
Open frame racks are lighter and cheaper than enclosed cabinets. Enclosed cabinets look cleaner and protect equipment but cost more and require ventilation planning.
Rack Layout Strategy
Plan your rack layout before mounting anything:
Top: Patch panels or network equipment (connects to ceiling-mounted devices)
Upper-middle: Video processors, receivers, switchers (stuff that connects to multiple things)
Lower-middle: Computers, playback devices, anything that needs regular access
Bottom: Power distribution, UPS if used, heavy equipment
Leave 1U of blank space between hot-running equipment for airflow. Computers and receivers generate heat—don’t stack them directly.
Cable Management Within Racks
Horizontal cable managers (the bars with slots or loops) mount between equipment at intervals. Route cables through them to prevent sagging bundles.
Vertical cable managers (also called lacing bars) mount on the sides of racks. Cables run up and down these channels, keeping them organized and out of the way.
Velcro cable ties are reusable and don’t damage cables like zip ties can. Use them every 12-18 inches to keep bundles neat.
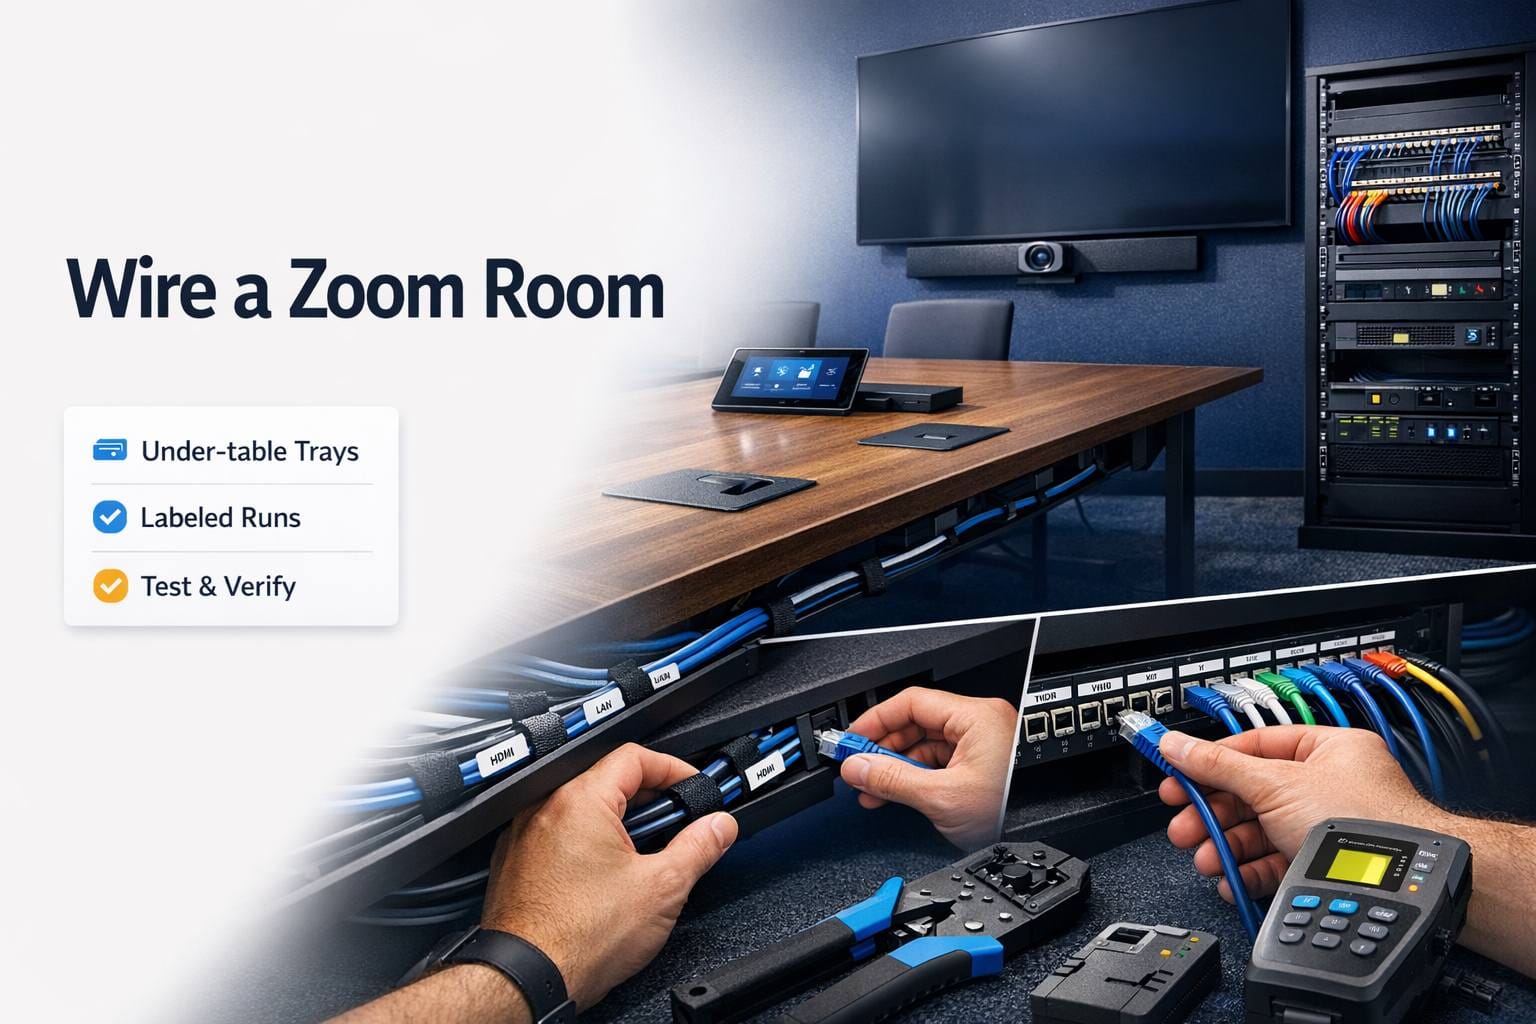
Label everything. Every cable. Both ends. Use a label maker or printable adhesive labels. When you’re troubleshooting at midnight before a big meeting, labels save you.
Power in Racks
Rack-mount power strips or PDUs (power distribution units) mount in the rack and provide multiple outlets.
Get one with enough outlets for current equipment plus 30% more for future additions. Running out of outlets in a closed rack is frustrating.
Switched PDUs let you remotely power-cycle equipment. Worth it for computers and equipment that occasionally need rebooting.
UPS (uninterruptible power supply) isn’t required but protects against brief power blips during meetings. Nothing worse than the room going dark mid-presentation because of a momentary power fluctuation.
Network Cabling Best Practices
Your Zoom Room needs solid network connectivity. Wireless is convenient but wired is better.
Always Run Ethernet to the Computer
Zoom Rooms computers should be hardwired. WiFi works, sure, but Ethernet is more reliable and doesn’t compete with other wireless traffic.
Run Cat6 or Cat6a. Not Cat5e. The cost difference is minimal and Cat6/6a supports 10-gigabit speeds for future needs.
Terminate Cables Properly
Punching down Cat cables into keystone jacks or patch panels requires technique. Bad terminations cause network problems.
Follow the color code (T568A or T568B—doesn’t matter which but be consistent).
Maintain cable twist as close to the termination point as possible. Don’t untwist more than 0.5 inches of cable. Untwisted pairs cause crosstalk and reduce performance.
Don’t over-tighten cable ties or bend cables at sharp angles. Cat cable is designed with specific twist rates and geometry. Damage that and performance drops.
Test every cable with a network tester. Cheap testers verify continuity and wiring order. Better ones test for actual performance and certify the installation.
Patch Panel Organization
If you’re terminating multiple cables (display, camera, mics, whatever), use a patch panel in your rack.
All permanent cables terminate at the patch panel. Short patch cables connect from the panel to equipment. This makes changes way easier—swap a 6-inch patch cable instead of pulling a 50-foot cable through walls.
Label the patch panel clearly. Match labels to wall plates and create a documentation sheet showing what’s what.
Dealing with Long Cable Runs
Sometimes you need to get signals farther than cables normally go. This is common in larger town hall spaces or divisible conference rooms.
HDMI Distance Solutions
Standard HDMI works reliably to about 25 feet for 4K signals. Beyond that, you have options:
Active HDMI cables have built-in signal boosters. Good to 50-75 feet. They’re directional—one end is labeled “source,” the other “display.” Hook them up backwards and nothing works.
HDMI over Cat6 extenders (HDBaseT) send HDMI signals over Cat cable to 300+ feet. You need a transmitter at the source and receiver at the display. Some units also send USB, IR control, and power over the same cable.
Fiber HDMI cables work to insane distances (1,000+ feet) but cost significantly more. Only needed for really unusual situations.
USB Extension
USB is tricky beyond 16 feet. For cameras and peripherals farther away:
Active USB extension cables boost the signal for runs to 30-50 feet.
USB over Cat extenders send USB signals over Cat cable to 150+ feet. More reliable than long USB cables.
USB hubs can split signals but don’t extend distance. Place them midway if you need multiple devices at distance.
Creating the Professional Look
Clean wiring isn’t just functional—it affects how people perceive the whole room.
Color-Coordinated Cables
Match cable colors to surfaces where visible. White cables on white walls, black cables on dark surfaces. It’s a small thing that makes a big difference.
For cables in racks, some installers color-code by type: blue for network, red for video, yellow for audio, etc. Makes tracing cables easier.
Cable Sleeves and Wraps
For cables that must be visible (like on conference tables), use cable sleeves or spiral wrap. It bundles multiple cables into one clean-looking group.
Neoprene cable sleeves are flexible and look clean. They zip open for adding or removing cables.
Split loom tubing is cheaper and works fine in hidden areas. Looks more industrial so not ideal for visible runs.
Furniture Integration
Conference tables with built-in cable management make everything easier. Power and data connections pop up from the table surface, hiding cables underneath.
If retrofitting existing furniture, use cable trays mounted under tables. Cables run through the tray instead of draping off table edges.
Testing and Troubleshooting
Before you call the job done, test everything. Thoroughly.
System Testing Checklist
Video: Verify displays show correct input from computers and sources. Check resolution is correct (4K displays should show 4K, not 1080p).
Audio: Test all microphones from multiple seating positions. Verify speakers produce clear sound. Check for echo, feedback, or buzzing.
Network: Run speed tests from the Zoom Room computer. Verify you’re getting full bandwidth (at least 10-15 Mbps up/down for quality video calls).
Control: Test the touch panel or controller. Verify all buttons work, sources switch correctly, volume controls function.
Integration: If you’ve got professional lighting and sound calibration, test that it all works together properly.
Common Wiring Problems
Intermittent HDMI signal: Usually a cable length issue or poor-quality cable. Swap for active cable or HDBaseT extender.
Network drops during calls: Could be cable problems (test it), insufficient bandwidth, or network congestion. Hardwiring usually fixes WiFi-related drops.
Ground loops causing audio hum: Happens when equipment is plugged into outlets on different circuits. Use a ground loop isolator or plug everything into the same circuit/power strip.
USB devices not detected: Distance issue or power problem. USB powered devices need active extension or powered hubs.
Room-Specific Wiring Considerations
Different room types have different cabling challenges and requirements.
Small Huddle Rooms
Compact meeting spaces are the easiest to wire. Short cable runs mean standard cables work fine. Usually just need:
- One HDMI run from table to display
- Power to display
- Network drop to computer/controller
- Maybe USB for camera if it’s not built into an all-in-one unit
Surface-mount raceways often work fine since runs are short and visible cables less problematic in smaller spaces.
Executive Boardrooms
High-end spaces demand invisible wiring. Every cable in-wall or in-ceiling. Patch panels in equipment closets. Multiple mic zones properly terminated.
These spaces often integrate with building automation, requiring additional control wiring. Plan for this complexity from the start.
Multi-Purpose Spaces
Rooms that serve different functions need flexible wiring. Consider:
- Multiple video sources (HDMI at table, wall plates for laptops)
- Switchable audio zones
- Reconfigurable displays
Build flexibility into your infrastructure even if not using it immediately. Running extra Cat6 drops costs little during initial install but saves thousands later.
Platform Differences in Wiring
While cable management principles stay consistent across platforms, there are some nuances worth knowing.
Zoom Rooms Specifics
Zoom Room installations typically use a dedicated computer (Mac Mini or similar) running Zoom Rooms software, plus a tablet controller. This means:
- Network drops at computer location and controller location
- USB runs from computer to camera (or USB over Cat extenders)
- HDMI from computer to display
- Power at computer, controller, and display
Teams and Meet Rooms
Microsoft Teams implementations and Google Meet hardware setups have similar requirements but different certified hardware lists. Cable specifications stay the same—it’s the endpoints that differ.
The cabling approach you use works across platforms, which is important for future-proofing your investment.
Maintenance Access and Documentation
The install isn’t done when cables are hidden. You need to maintain and troubleshoot later.
Leave Access Points
Don’t seal up every access hole. Leave small access panels where you might need to pull additional cables later.
Mark access points on your documentation so future technicians (or future you) can find them.
Create an As-Built Document
Take photos during installation showing cable paths before you close walls. Document:
- Cable types and lengths for each run
- Where cables are routed (through which walls, ceiling spaces, conduit)
- Wall plate locations with cable labels
- Equipment connections and settings
- Network configuration details
Store this digitally and print a copy that stays with the room’s equipment. When something breaks, this documentation is gold.
Label Excessively
You can’t over-label. Every cable. Every connection. Every wall plate. Every rack component.
Use consistent labeling conventions: room name + device type + number (like “CR-A Camera 1” or “CR-A Display HDMI”).
When to Call Professionals
Some installations are DIY-friendly. Others need professional help.
DIY-Appropriate Scenarios
Small rooms where you can use surface-mount raceways instead of in-wall wiring. Simple equipment that connects via a few cables. Buildings where you own the space and can make modifications.
If you’re comfortable with basic tools and have patience, basic equipment installation in small spaces is doable.
Call Pros For
Multiple rooms requiring consistent implementation. Commercial buildings with strict code requirements. Situations requiring permit and inspection. Any installation where you’ll open walls in a building you don’t own.
Professional video conferencing specialists have specialized tools, understand commercial building codes, carry insurance, and work way faster than DIYers. For complete Zoom Room implementations, it’s worth the investment.
They also understand how to optimize wiring for the best possible meeting performance and user experience, not just getting cables from point A to point B.
The Real Difference Clean Wiring Makes
Here’s why this all matters.
A well-wired room is maintainable. When something breaks (and eventually something will), you can trace cables, identify problems, and fix issues quickly. Rats’ nests of unlabeled cables turn simple fixes into hour-long troubleshooting sessions.
Clean wiring looks professional. It makes the technology feel intentional rather than cobbled together. Clients notice. Employees notice. It affects how seriously people take the space.
And honestly? There’s satisfaction in doing it right. Opening a rack and seeing neat cable bundles, proper labeling, and logical organization just feels good. It’s the difference between work you’re proud of and work you hope nobody looks at too closely.
So take the time. Plan the cable paths. Use proper materials. Label everything. Test thoroughly. The difference between a mediocre install and a truly professional one is usually just a few extra hours of careful work—but the results last for years.