
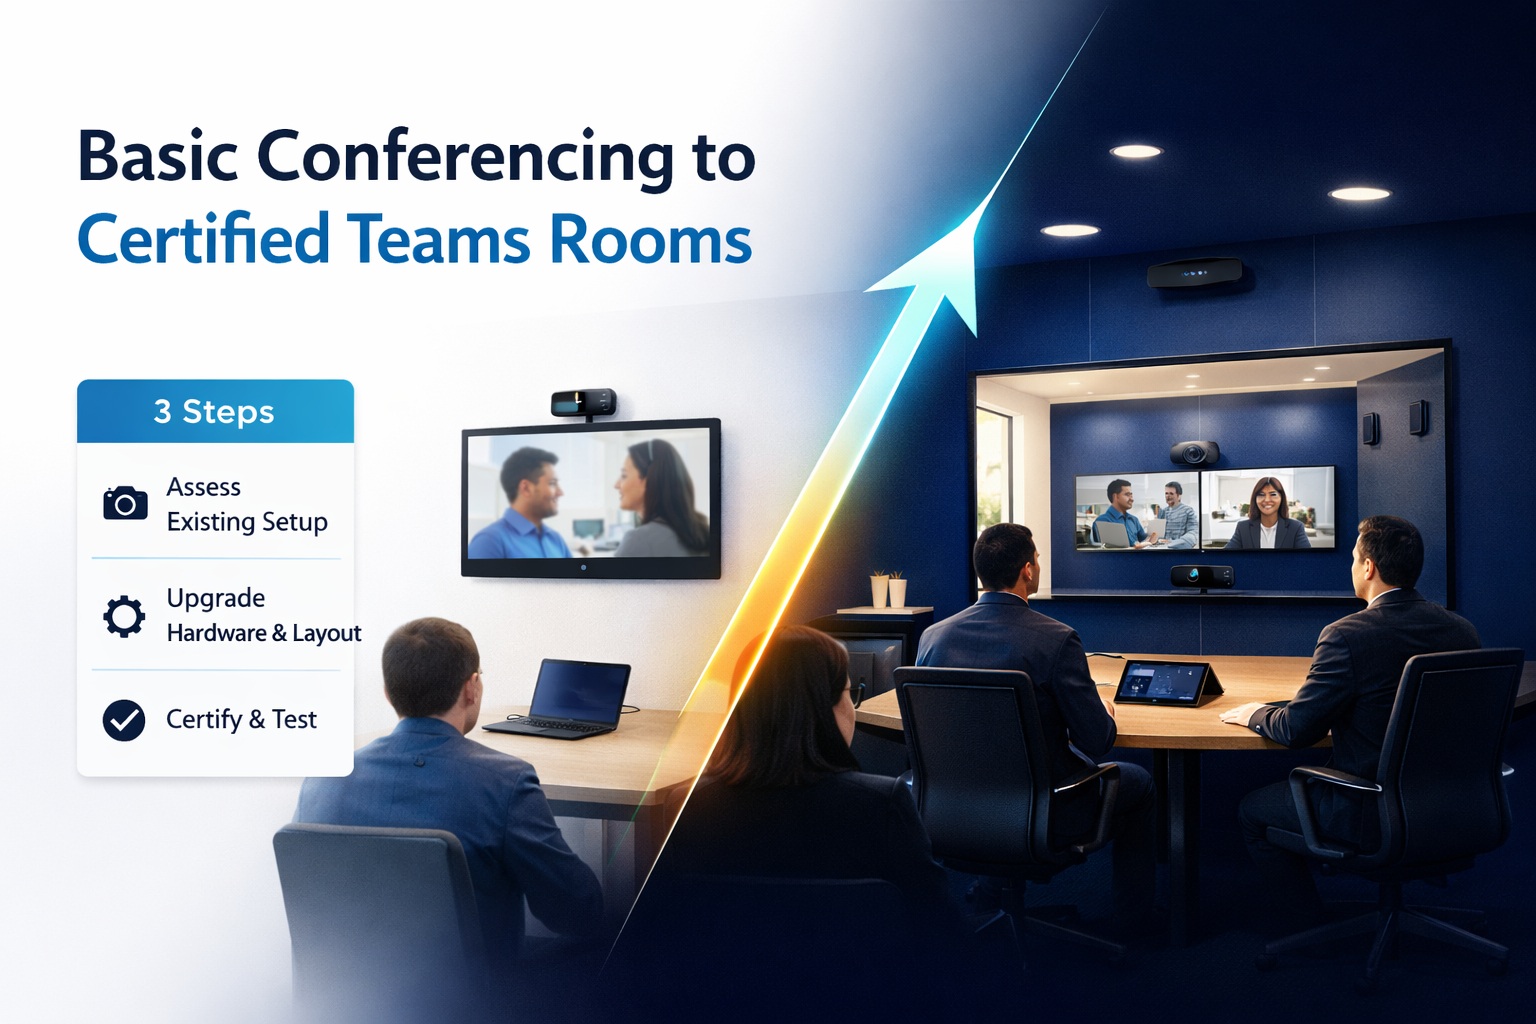
You’ve been making do with people huddling around laptops for Teams meetings. It works, sort of. But it’s janky—one person controls the screen, the microphone picks up whoever’s closest, remote participants can’t see half the room, and nobody can figure out screen sharing.
You’re ready to upgrade to proper Microsoft Teams Rooms. Smart move. But here’s what nobody tells you: migration isn’t just buying certified hardware and plugging it in. It’s planning which rooms to upgrade first, understanding licensing requirements, dealing with network infrastructure, training users, and managing the transition without disrupting business.
I’ve migrated dozens of organizations from basic “laptop on the table” conferencing to certified Teams Rooms. When done right, the transformation is dramatic—meetings start on time, everyone’s visible and audible, one-touch operation, and actual productivity. When done wrong, you’ve got expensive equipment nobody uses because it’s complicated or doesn’t work reliably.
This guide walks through the complete migration process—assessing your current setup, planning the deployment, selecting certified hardware, installation and configuration, user training, and avoiding the expensive mistakes that derail migrations.
Let’s upgrade your conferencing the right way.
Assessing Your Current Conferencing Setup
Before buying anything, understand what you have and what you actually need.
Inventory Your Current Equipment
Make a list:
- How many conference rooms?
- Current equipment in each room (TVs, displays, speakers, cameras)?
- What works well, what doesn’t?
- Room sizes and typical occupancy
- How often each room is used for video calls
Current pain points:
- Which rooms frustrate users most?
- What specific problems occur regularly? (Poor audio? Can’t see everyone? Tech difficulties?)
- Do remote participants complain about specific rooms?
- How much time is wasted troubleshooting before meetings start?
This inventory tells you which rooms to upgrade first and what problems you’re solving.
Identify Room Types and Priority
High-priority rooms:
- Executive boardrooms (leadership meetings can’t fail)
- Frequently-used conference rooms (high utilization = high ROI)
- Rooms with worst current experience (biggest improvement potential)
Medium-priority rooms:
- Secondary conference spaces
- Department-specific rooms
- Training rooms
Low-priority rooms:
- Rarely-used spaces
- Small huddle rooms where laptop conferencing is adequate
- Rooms scheduled for renovation or elimination
Start with high-priority rooms. Prove the value. Then expand.
Calculate User Adoption and Usage
Questions to answer:
- How many employees regularly participate in Teams meetings?
- How many meetings happen daily across the organization?
- What percentage are hybrid (some remote, some in-room)?
- What’s the trend? (Increasing or stable?)
High Teams usage justifies investment faster. If you’re doing 50+ hybrid meetings daily, proper Teams Rooms deliver immediate value.
Understanding Teams Rooms Licensing
Microsoft’s licensing for Teams Rooms is separate from user licenses. This trips people up.
License Types
Microsoft Teams Rooms Basic:
- Free for first 25 rooms
- Core functionality
- Standard support
- Good for: Testing, small deployments, budget-conscious organizations
Microsoft Teams Rooms Pro ($40/room/month):
- Advanced features
- Conditional access policies
- Remote management and monitoring
- Analytics and reporting
- Enhanced support
- Good for: Professional deployments, organizations needing management tools
What You Already Have
Microsoft 365 Business/Enterprise: Includes user Teams licenses but NOT Teams Rooms licenses.
Confusion point: People assume M365 licenses cover conference rooms. They don’t. Rooms need separate licenses.
Budgeting impact: 10 conference rooms × $40/month × 12 months = $4,800/year for Pro licenses (or free for Basic up to 25 rooms).
Room Mailboxes
Each Teams Room needs a room mailbox in Microsoft 365.
Setup:
- Create room mailbox in M365 admin center
- Assign Teams Rooms license to that mailbox
- Configure booking policies (who can book, how far in advance, etc.)
Calendar integration: This mailbox enables one-touch join—meetings scheduled in that room automatically appear on room console.
Understanding complete Teams Room planning includes getting licensing right from the start.
Step 1: Planning Your Migration
Proper planning prevents problems later.
Create Migration Timeline
Realistic timeline for typical organization:
Month 1: Assessment, planning, budgeting
- Inventory existing equipment
- Identify priority rooms
- Get budget approval
- Research hardware options
Month 2: Procurement and preparation
- Order certified equipment
- Prepare network infrastructure
- Create room mailboxes
- Plan installation schedule
Month 3: Installation and configuration
- Install rooms 1-3 (pilot deployment)
- Test and troubleshoot
- Gather user feedback
- Refine approach
Month 4+: Rollout remaining rooms
- Install 2-3 rooms per week
- Train users as rooms come online
- Monitor and optimize
Total: 4-6 months for 10-room deployment. Scale timeline based on room count.
Budget Planning
Per-room costs (medium conference room example):
Equipment:
- All-in-one device (Logitech Rally Bar): $2,500
- Touch console (Logitech Tap): $1,000
- Compute device (if separate): $1,200
- Display (if needed): $800-1,500
- Equipment subtotal: $4,500-$6,200
Installation:
- Professional installation: $1,000-2,000 per room
- Network infrastructure: $500-1,500 per room
- Cable management and wiring: Included in installation
Licensing:
- Teams Rooms Pro: $480/year per room (or free Basic)
Total first-year cost per room: $6,000-$10,000
10 rooms: $60,000-$100,000 first year
Hidden costs:
- Project management time
- User training
- Network upgrades (if needed)
- Ongoing support
Budget these or you’ll blow past estimates.
Network Infrastructure Assessment
Teams Rooms need reliable networks. Assess readiness now.
Requirements per room:
- Dedicated network drop (Ethernet)
- 10 Mbps down, 5 Mbps up minimum (more is better)
- Quality of Service (QoS) configured
- Firewall allows Teams traffic
Check:
- Can you run Ethernet to each conference room?
- Is network bandwidth adequate? (Run bandwidth capacity planning)
- Are switches capable enough? (Gigabit ports, PoE if needed)
- Is WiFi acceptable if Ethernet impossible? (Not ideal but sometimes necessary)
Upgrade if needed: Better to fix network before installing rooms than troubleshoot connectivity issues later.
Step 2: Selecting Certified Hardware
Only buy Microsoft-certified Teams Rooms equipment. This is non-negotiable.
Why Certification Matters
Certified equipment:
- Tested to work with Teams Rooms software
- Guaranteed compatibility
- Coordinated driver and firmware updates
- Supported by Microsoft and manufacturer
- Listed in Microsoft’s certification database
Uncertified equipment:
- Might work initially
- Updates can break functionality
- No guaranteed support
- Troubleshooting is nightmare
- Wastes money
Verification: Check Microsoft’s official Teams Rooms certification database before buying. Exact model numbers matter.
Following the hardware certification verification process prevents expensive mistakes.
Hardware Options by Room Size
Small rooms (4-6 people):
- All-in-one: Logitech Rally Bar Mini, Poly Studio X30, Yealink MeetingBar A20
- Simple, cost-effective, easy installation
- Budget: $2,000-$3,500 per room
Medium rooms (6-14 people):
- All-in-one: Logitech Rally Bar, Poly Studio X50
- Or modular: Separate camera + mics + speakers + compute
- Budget: $4,000-$8,000 per room
Large rooms (15+ people):
- Modular systems required
- Multiple cameras, ceiling mics, distributed speakers
- Custom design needed
- Budget: $10,000-$25,000+ per room
Match hardware to actual room size and usage. Don’t over-spec small rooms or under-spec large ones.
Standardization vs Variety
Standardize when possible: Using same equipment across similar rooms simplifies support, training, and inventory.
Example approach:
- Standard for small rooms: Rally Bar Mini
- Standard for medium rooms: Rally Bar
- Custom for large/specialty rooms
Benefits: Consistent user experience, easier troubleshooting, volume discounts.
When to vary: Different room sizes/types legitimately need different solutions.
Step 3: Installation and Physical Setup
Time to actually install equipment in rooms.
Pre-Installation Preparation
Before installer arrives:
- Room mailboxes created and licensed
- Network connectivity verified
- Mounting locations decided
- Equipment delivered and unpacked
- Users informed of installation schedule
Day-of preparation:
- Clear the room
- Provide access to network equipment
- Have ladder/tools available if installer needs them
- Designate someone available for questions
Camera Placement
Height: 6-8 feet from floor for medium rooms. Eye level when people are seated.
Position: Centered on the seating area. For rectangular tables, typically at one end facing down the table length.
Angle: Slight downward angle (10-15 degrees) to capture faces clearly.
Avoid: Backlighting (windows behind participants), positioning so high people look like dots, extreme angles.
Optimal camera and microphone positioning dramatically affects meeting quality.
Display Placement
Single display: Mount at comfortable viewing height (center of screen roughly eye level when seated).
Dual displays:
- One for remote participants
- One for content sharing
- Position side-by-side or stacked based on room layout
Size recommendations:
- Small rooms: 55-65″
- Medium rooms: 65-75″
- Large rooms: 75-85″ or multiple displays
Touch Console Placement
Table-mounted: Center of table or near room entry for easy access when entering.
Wall-mounted: Near room entrance at standing height for booking/starting meetings.
Accessibility: Everyone should be able to see and reach the console.
Cable Management
Professional installation includes:
- In-wall cable runs where possible
- Conduit for exposed cables
- Proper cable dress behind displays
- Labeled cables for future maintenance
Sloppy cable management looks unprofessional and causes maintenance headaches. Do it right during installation.
Step 4: Configuration and Testing
Hardware’s installed. Now configure it properly.
Initial Device Setup
Power on and connect to network: Hardwired Ethernet preferred.
Device enrollment:
- Device boots and prompts for setup
- Sign in with room mailbox credentials
- Device downloads Teams Rooms software
- Auto-configures based on room account settings
First boot: Takes 15-30 minutes. Don’t interrupt it.
Room-Specific Configuration
Display arrangement: Configure which display shows participants vs content (if dual displays).
Audio settings:
- Default volume level
- Microphone sensitivity
- Echo cancellation verification
Camera settings:
- Default framing
- Enable/disable auto-framing
- Set preferred zoom level
Meeting settings:
- Automatic meeting acceptance
- Proximity join (allows users to bring laptop content to room)
- Dual screen configuration
Testing Checklist
Before considering room complete:
☐ Test call with remote participant ☐ Verify camera captures all seats clearly ☐ Verify microphone picks up from all seats ☐ Check speaker volume at all seats ☐ Test screen sharing from laptop ☐ Verify one-touch join works for scheduled meeting ☐ Test with actual users (not just IT) ☐ Verify calendar integration working ☐ Check network connectivity is stable ☐ Test all features users will use
Don’t skip testing: Better to find issues now than during CEO’s first meeting.
Step 5: User Training and Adoption
Equipment works. Now get people using it.
Training Approach
Don’t assume it’s intuitive: Even “one-touch join” needs explaining first time.
Quick start guides: One-page laminated card in each room showing:
- How to start scheduled meeting (tap meeting on console)
- How to start ad-hoc meeting (tap “Meet now”)
- How to share screen (HDMI cable or wireless)
- How to adjust volume
- Who to call for help
Hands-on sessions: 15-minute group training in actual room. Show, then let them try.
Champion program: Identify early adopters to help colleagues and provide feedback.
Common User Questions
“How do I start a meeting?”: Tap the meeting name on console. That’s it.
“Can I use my laptop?”: Yes—HDMI cable for screen share, or proximity join for wireless.
“What if my meeting isn’t showing?”: Check that room was invited to meeting. Verify calendar integration.
“How do I change volume?”: Touch console volume controls or use room remote if provided.
“What if it’s not working?”: Call help desk (provide number prominently).
Managing the Transition
Parallel running period: Keep backup options available for a few weeks while users adapt.
Feedback collection: Survey users after first few meetings. What works? What’s confusing?
Iterate quickly: If everyone’s confused by something, fix it. Don’t wait.
Success stories: Share positive experiences. “Marketing team cut meeting setup time from 10 minutes to 30 seconds.”
Step 6: Ongoing Management and Maintenance
Deployment isn’t done when rooms are installed. Ongoing management matters.
Remote Monitoring
Teams Rooms Pro includes monitoring: View health status of all rooms from central dashboard.
What to monitor:
- Device online/offline status
- Incidents and errors
- Usage statistics
- Firmware versions
- Peripheral health
Proactive management: Fix issues before users report them. Replace failing equipment before it completely dies.
Firmware and Software Updates
Microsoft pushes updates regularly: Teams Rooms software, device firmware, peripheral firmware.
Update strategy options:
Auto-update (recommended): Devices update overnight automatically.
Staged rollout: Test updates on pilot room first, then roll out.
Manual control: Delay updates until tested (most conservative, most work).
Reality: Auto-update works fine for most organizations. Problems are rare.
Support and Troubleshooting
Common issues:
- Room doesn’t appear in calendar
- Peripherals not detected
- Poor audio quality
- Camera not working
Troubleshooting process:
- Check Teams Admin Center for reported issues
- Verify network connectivity
- Reboot device (fixes 70% of issues)
- Check peripheral connections
- Review error logs
- Call support if issue persists
Response time expectations: Critical rooms (boardrooms) need same-day response. Others can wait 1-2 days.
Avoiding Common Migration Mistakes
Learn from others’ errors.
Mistake 1: Buying Uncertified Equipment
Why tempting: Cheaper, looks similar to certified hardware.
Reality: Updates break things, support is impossible, compatibility issues arise.
Fix: Only buy from Microsoft’s certification list. Period.
Mistake 2: Skipping Network Assessment
Why tempting: Assume existing network is fine.
Reality: Network issues cause 80% of Teams Rooms problems.
Fix: Test network before installing rooms. Upgrade if needed.
Mistake 3: No User Training
Why tempting: “It’s so easy, they’ll figure it out.”
Reality: Untrained users avoid new systems or use them wrong.
Fix: Budget time for training. Make it mandatory.
Mistake 4: Installing Everything at Once
Why tempting: Get it done fast.
Reality: Issues compound, users overwhelmed, no time to learn from pilot.
Fix: Pilot 2-3 rooms, learn, adjust, then roll out rest.
Mistake 5: Ignoring Room Design
Why tempting: Focus only on equipment.
Reality: Great equipment in poorly designed room delivers poor results.
Fix: Consider complete room layout optimization including furniture, camera angles, lighting.
Measuring Success
How do you know migration was successful?
Quantitative Metrics
Meeting reliability: 95%+ meetings start without technical issues.
Setup time: Meeting starts within 1 minute of scheduled time.
Help desk tickets: Decrease in conferencing-related support requests.
Room utilization: Increase in conference room bookings (rooms are easier to use).
Abandonment rate: Fewer canceled meetings due to technical problems.
Qualitative Feedback
User surveys: Rate ease of use, meeting quality, overall satisfaction.
Remote participant feedback: Can they see and hear in-room participants clearly?
Executive support: Leadership uses and endorses the systems.
Anecdotal reports: “Our meetings are so much smoother now.”
ROI Calculation
Time savings: 5 minutes saved per meeting × 50 meetings/day × $50/hour blended rate = $200/day = $52,000/year
Improved productivity: Harder to quantify but real. Better meetings = better decisions.
Reduced travel: Some meetings that were in-person can now be hybrid effectively.
Professional image: Client-facing meetings look more professional.
Next Steps After Initial Deployment
Migration doesn’t end with first rooms deployed.
Expanding to Additional Rooms
Lessons learned: Apply feedback from pilot rooms to later deployments.
Refined standards: Adjust equipment choices based on what worked best.
User-driven expansion: As people see Teams Rooms working, they request them for their spaces.
Advanced Features
Once basics are working:
- Content cameras for whiteboard sharing
- Intelligent speakers with voice tracking
- Coordinated systems for divisible room scenarios
- Integration with room booking systems
- Advanced analytics and reporting
Platform Consistency
If you also use other platforms: Consider whether to standardize on Teams or maintain multi-platform capability.
Native Teams Rooms: Best Teams experience but Teams-only.
Multi-platform rooms: More flexible but more complex. Possible with some hardware.
Getting Professional Help
When to DIY vs when to call experts.
DIY-Appropriate Scenarios
Small deployment (1-3 rooms): Small office, basic all-in-one equipment, strong internal IT, tight budget.
Tech-savvy team: IT staff comfortable with networking, Teams admin, troubleshooting.
Call Professionals For
Large deployments (10+ rooms): Coordination, project management, consistent quality across sites.
Complex rooms: Large boardrooms, multi-purpose spaces, architecturally challenging installations.
Limited internal resources: IT team is already overwhelmed, can’t dedicate time to project.
Mission-critical spaces: Executive boardrooms where failure isn’t acceptable.
Professional Teams Room deployment services handle planning, procurement, installation, configuration, training, and ongoing support—worth it for serious deployments.
The Bottom Line
Migrating from basic conferencing to certified Teams Rooms transforms how your organization meets.
Done right, the process is: assess current state, plan methodically, select certified hardware, install professionally, configure correctly, train users thoroughly, and manage ongoing.
Done wrong, it’s: buy cheap equipment, install hastily, skip training, wonder why nobody uses it.
The difference is approaching migration as a project, not a purchase. Equipment is important but it’s only part of the solution. Planning, network readiness, user adoption, and ongoing support determine success.
Start with pilot rooms. Learn what works. Refine your approach. Then expand confidently.
Your teams will thank you for meetings that actually work.