
You mount a beautiful display on the wall. The picture quality is perfect. The size is right. Then you step back and see cables dangling down to the floor like vines. It looks terrible.
Here’s the thing: professional installations hide cables. Period. Exposed cables ruin aesthetics, create trip hazards, and make even expensive equipment look cheap. But hiding cables properly requires planning, the right materials, and understanding building codes—especially in commercial spaces.
I’ve hidden cables behind hundreds of wall-mounted displays and touch panels. When done right, installations look clean, professional, and permanent. When done wrong, you’ve got holes in walls that don’t line up, cables that can’t be pulled through, or code violations that fail inspection.
This guide covers exactly how to hide cables for wall-mounted displays and touch panels—in-wall installation methods, surface-mount alternatives, commercial building considerations, code compliance, and the tools and techniques that separate amateur from professional results.
Let’s make your installation look as good as it functions.
Understanding Your Wall Construction
Before cutting anything, know what you’re working with.
Drywall Over Studs (Residential)
Most common: Standard home construction. Drywall screwed to wood or metal studs.
Advantages: Relatively easy to fish cables through. Standard tools work.
Stud spacing: 16 inches on center typical. Sometimes 24 inches.
Cavity depth: 3.5-5.5 inches depending on stud size (2×4 or 2×6).
Cable fishing: Straightforward with proper tools. Studs are obstacles but manageable.
Concrete or Brick Walls
Common in: Older commercial buildings, high-rises, industrial spaces.
Challenge: Can’t fish cables through solid walls.
Solutions: Surface-mount raceways, conduit, or core drilling for cable pass-through.
Cost: More expensive to hide cables. Drilling concrete requires specialized tools.
Metal Studs (Commercial)
Common in: Office buildings, commercial construction.
Similar to wood studs: But metal studs have sharp edges that can damage cables.
Protection required: Use grommets at penetration points. Cables can’t contact sharp metal.
Fire-stopping: Commercial buildings require fire-stopping at penetrations between floors.
Plaster and Lath (Old Buildings)
Found in: Pre-1950s construction.
Challenge: Wire lath behind plaster. Very difficult to fish cables.
Solutions: Often surface-mount is only practical option unless doing major renovation.
Damage risk: Old plaster cracks easily. Proceed carefully.
In-Wall Cable Installation Methods
The cleanest solution when walls allow it.
Basic In-Wall Installation Process
Step 1: Plan the route
- Measure from display location to equipment/outlet location
- Identify stud locations (stud finder)
- Check for obstacles (plumbing, electrical, HVAC)
Step 2: Cut access holes
- Old work box at display (if using recessed connection)
- Access hole at destination (equipment rack, outlet)
- May need intermediate access hole if horizontal run required
Step 3: Fish cables
- Fish tape or rods from destination up to display location
- Attach cables to fish tape
- Pull cables through wall cavity
- Leave service loop (extra cable coiled behind wall)
Step 4: Terminate and finish
- Connect cables at both ends
- Install wall plates or connection panels
- Patch and paint access holes if temporary
Time: 2-4 hours for typical installation depending on wall complexity.
When planning complete conference room setups, in-wall cabling is part of initial design.
In-Wall Cable Kits
What they are: Pre-packaged kits with everything needed for basic in-wall HDMI.
Contents:
- HDMI cables (usually two—one for signal, optional second for power/control)
- Wall plates (recessed boxes for top and bottom)
- Mounting hardware
Brands: Datacomm, Legrand, Monoprice, Cable Matters.
Cost: $30-100 depending on cable length and quality.
Limitations:
- Usually only HDMI
- May not include power for display
- Cable length fixed (can’t extend easily)
Best for: Simple home installations, single display, straightforward cable run.
In-Wall Rated Cables
Critical: Not all cables are safe for in-wall installation.
CL2/CL3 rated: Required for low-voltage cables in walls. Fire-safe jacket.
CMP (plenum rated): Required for cables in air-handling spaces (above drop ceilings, HVAC plenums).
Standard cables: NOT rated for in-wall use. Violation of electrical code and fire hazard.
HDMI in-wall: Must be CL2 or CL3 rated. Regular HDMI cables are code violations.
Why this matters: Inspectors red-tag non-rated cables. Insurance may not cover fire caused by non-rated cables.
Cost difference: In-wall rated HDMI costs 20-40% more than standard. Worth it for code compliance and safety.
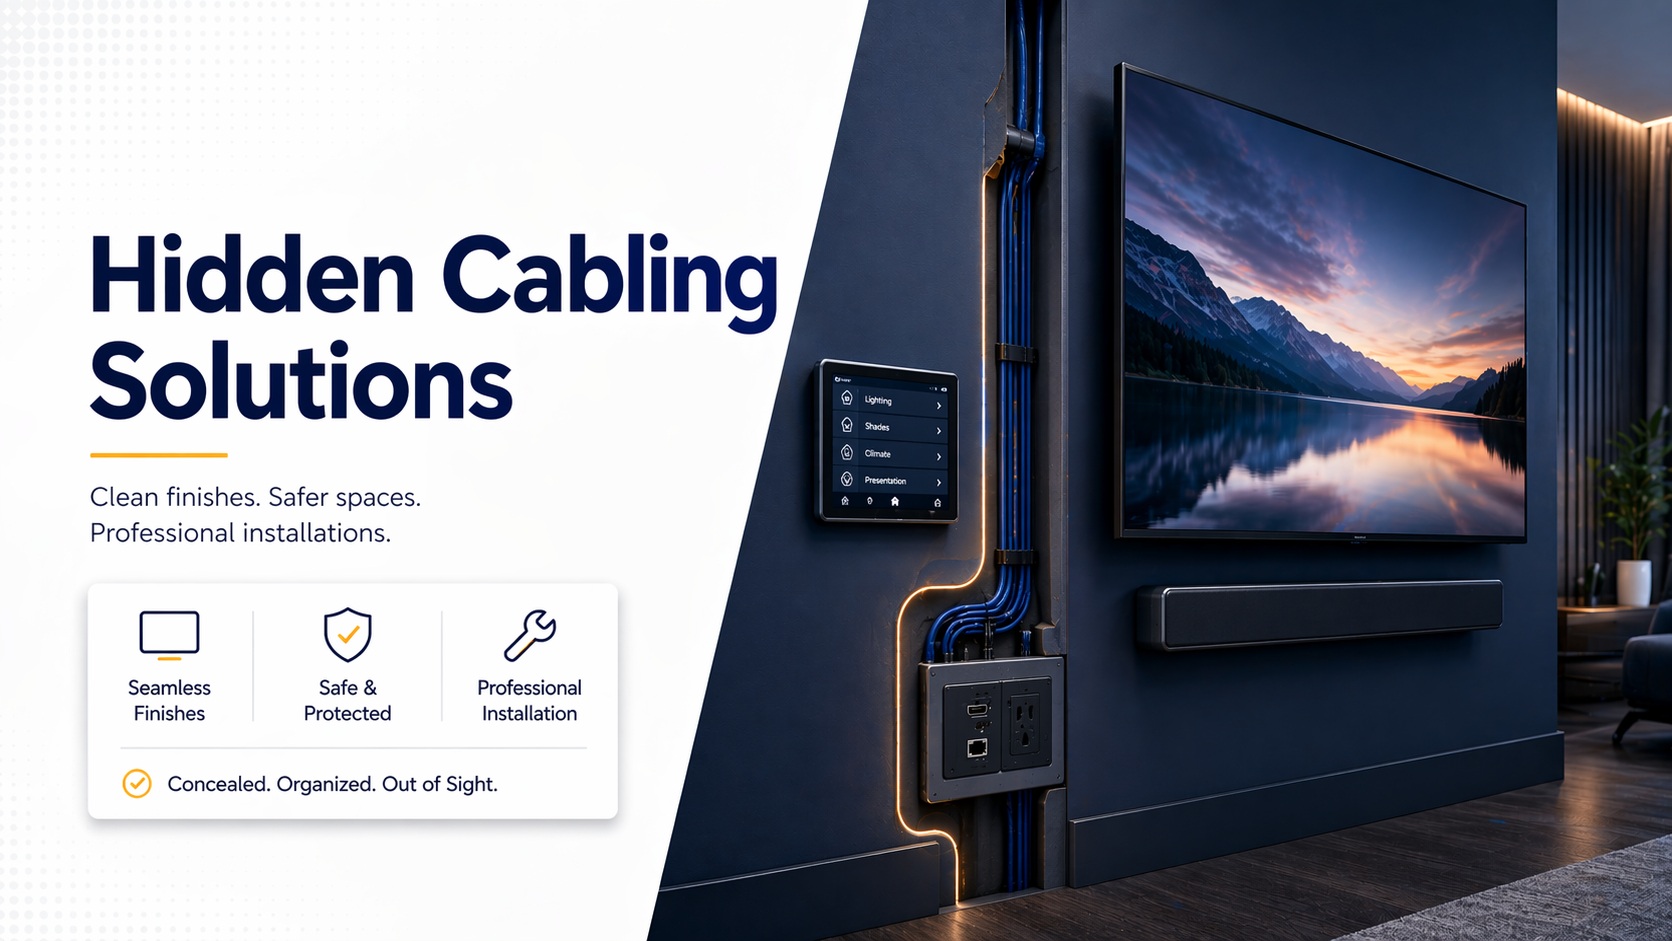
Recessed Connection Boxes
What they are: Low-voltage boxes recessed into wall. Cables terminate inside.
Benefits:
- Clean finished appearance
- Protects connections
- Allows cable changes (pass-through style)
- Professional look
Types:
- Fixed connections (HDMI, network, USB hardwired)
- Pass-through (hole with brush plate, any cable type fits)
- Combination (some fixed ports, some pass-through)
Installation: Cut wall opening, mount box to stud or use old-work brackets, run cables, install cover plate.
Where to place: Directly behind display (hidden when mounted) or offset to side (accessible).
Understanding professional cable management approaches ensures installations meet standards.
Surface-Mount Cable Management
When in-wall isn’t possible or practical.
Cable Raceways and Channels
What they are: Plastic or metal channels that mount to wall surface. Cables run inside.
Types:
- Paintable plastic (can match wall color)
- Pre-finished (white, black, metallic)
- Metal (commercial/industrial appearance)
- Flat adhesive (minimal profile, limited capacity)
Sizes: 0.5″ to 4″ wide depending on cable quantity.
Installation:
- Adhesive backing (peel and stick) or screws
- Route cables inside
- Snap on cover
Pros: Easy installation, no cutting walls, cables accessible for changes.
Cons: Visible. Breaks up wall surface. Can look cheap if not done well.
Making it better: Paint to match walls. Use inside corners and along baseboards. Keep runs straight and level.
Crown Molding Raceway
Clever solution: Cable channel that looks like decorative crown molding.
Installation: Runs along ceiling line like normal crown molding but hollow inside for cables.
Benefit: Cables hidden in plain sight. Looks like architectural detail.
Use case: Drop cables from ceiling to display location. Molding along ceiling, behind display on wall.
Limitation: Only works along ceiling line. Can’t route mid-wall.
Cost: $3-8 per linear foot. More than basic raceway but better aesthetics.
Conduit Solutions
When to use: Commercial installations, exterior locations, industrial settings.
Types:
- EMT (metal conduit): Durable, professional, required in some commercial applications
- PVC: Indoor/outdoor use, cheaper, easier to work with
- Flexible conduit: Short runs with bends
Installation:
- Mount conduit to wall with straps
- Pull cables through conduit
- Terminate at junction boxes
Appearance: Industrial/commercial look. Not ideal for residential unless painted creatively.
Benefit: Maximum protection. Code compliant everywhere. Future cable pulls easy.
Power Solutions for Wall-Mounted Displays
Power is half the cable management problem.
In-Wall Power Kit Options
Recessed power inlet: Low-voltage power kit routes power safely through wall.
How it works:
- Power outlet behind TV (connects to kit)
- Cable runs down wall (inside cable management system)
- Power inlet box at bottom connects to wall outlet
Code compliance: UL-listed kits designed to meet electrical code.
Brands: PowerBridge, DataComm, Legrand.
Cost: $60-120 for complete kit.
Installation: Requires cutting two wall openings, fishing cable, basic electrical work.
Important: These kits don’t run line voltage (120V) through wall. That requires electrician and proper electrical boxes.
Electrical Outlet Behind Display
Proper solution: Electrician installs recessed outlet behind where display will mount.
Benefits:
- Completely hidden power
- Code compliant
- No visible cords
Process:
- Electrician runs wire from nearby outlet or circuit
- Installs recessed box behind display location
- Display plugs directly into hidden outlet
Cost: $150-300 for electrician depending on complexity.
Best practice: Do this during display installation planning, not after mounting.
Power Over Ethernet (PoE) Displays
Emerging option: Some commercial displays support PoE.
Benefit: Single Ethernet cable provides data AND power.
Requirements: PoE+ or PoE++ switch (regular PoE insufficient for displays).
Limitations: Limited display selection. Commercial products, not consumer.
Use case: Commercial conference room installations with PoE infrastructure.
For systems using PoE switches for AV equipment, PoE displays simplify cabling.
Touch Panel and Controller Mounting
Touchpanels have unique cabling challenges.
Flush-Mount Touch Panels
Installation: Panel recessed into wall, flush with surface.
Cabling:
- Power (often PoE)
- Network (Ethernet)
- Sometimes USB or control cables
Back box depth: Need 2-4 inches behind wall for panel electronics and cable connections.
Gang box sizes: Single, double, or triple gang depending on panel size.
Stud interference: If box location hits stud, need offset mounting or box extender.
Surface-Mount Touch Panels
Installation: Panel mounts to wall surface on bracket or directly.
Cable access: Usually from behind panel, cables route down or into wall.
Benefits: Easier installation, shallower depth requirement.
Appearance: Panel protrudes from wall slightly. Less sleek than flush-mount.
Table-Mount Controllers
Common: Crestron, Extron, AMX table controllers.
Cable path: From table location to equipment (often across room).
Solutions:
- Floor boxes with cable access
- Under-table cable tray
- Along baseboards to closest wall, then in-wall to equipment
Flexibility: Table-mount allows moving controller. Cable management more challenging.
Commercial Building Considerations
Office buildings have stricter requirements than homes.
Code Compliance Requirements
Plenum-rated cables: In spaces above drop ceilings or with air circulation.
Fire-stopping: Penetrations through fire-rated walls must be fire-stopped.
Conduit requirements: Some jurisdictions require conduit for certain cable types.
Electrical code: Power installations must be by licensed electrician, proper boxes, permits.
Inspections: Commercial work gets inspected. Non-compliant work fails and requires expensive correction.
Following NYC commercial installation standards ensures compliance in strict jurisdictions.
Building Management Approval
Required for: Any penetrations, running cables through building infrastructure, modifying walls.
Process: Submit installation plan, get approval before starting work.
Restrictions: May dictate cable routing, installation hours, access procedures.
Coordination: Building engineer, security, other tenants must be notified.
Union Labor Requirements
Some buildings: Require union labor for certain work.
Applies to: Electrical work, structural modifications, sometimes AV installations.
Plan ahead: Understand requirements before bidding job or starting work.
Tools and Materials
What you actually need for hidden cabling.
Essential Tools
Fish tape or rods: For pulling cables through walls. 25-50 foot typical.
Stud finder: Locate studs before cutting. Magnetic or electronic.
Keyhole saw / drywall saw: Cut wall openings. Hand saw or oscillating multi-tool.
Drill and bits: Drill through studs for cable passage. Hole saw for large penetrations.
Wire pulling lubricant: Makes pulling multiple cables through tight spaces easier.
Voltage tester: Check for live wires before cutting into walls.
Flashlight / inspection camera: See inside wall cavities.
Level and measuring tape: Ensure alignment and accurate placement.
Safety Equipment
Safety glasses: Drywall dust and debris.
Dust mask: Cutting drywall creates fine dust.
Gloves: Protect hands from sharp edges.
Drop cloth: Protect floor and furniture from dust.
Materials Checklist
Cables: Appropriate in-wall rated cables for your application.
Wall plates / boxes: Recessed boxes and cover plates.
Cable supports: Staples or clips (careful not to pinch cables).
Grommet / bushings: Protect cables at sharp metal stud edges.
Fire-stop material: For commercial penetrations.
Patching supplies: If creating temporary access holes (spackle, sandpaper, paint).
Step-by-Step Installation Example
Real-world display mounting with hidden cables.
Scenario: 65″ Display in Conference Room
Requirements:
- HDMI from display to conference table (20 feet)
- Network cable for smart TV
- Power behind display
- Touch panel beside display for room control
Process:
1. Planning (1 hour):
- Measure and mark display center point
- Mark touch panel location (3 feet to right, waist height)
- Verify stud locations
- Identify cable routing path
- Check for obstacles (outlets, switches, other wiring)
2. Display power (by electrician, 2 hours):
- Install recessed outlet behind display location
- Wire from nearby circuit
- Code-compliant boxes and wiring
3. Cable pathway (2-3 hours):
- Cut recessed box opening behind display
- Cut opening at equipment location (conference table)
- Fish HDMI and Cat6 cables through wall
- Pull cables with fish tape
- Leave service loops at both ends
4. Touch panel (1 hour):
- Install low-voltage box for panel
- Run Cat6 from panel location to equipment rack
- Pull through wall cavity
5. Termination (1 hour):
- Install connectors on all cables
- Mount wall plates
- Connect to equipment
- Test all connections
6. Display mounting (1 hour):
- Mount display bracket to wall
- Hang display
- Connect power and cables
- Verify all working
Total time: 8-9 hours (including electrician time).
Cost: $800-1,500 including labor, materials, electrician.
For complete professional installation services, this process is streamlined with experience and proper tools.
Troubleshooting Common Issues
When things don’t go as planned.
Can’t Fish Cable Through
Problem: Fish tape won’t go through. Hitting obstacle.
Common causes:
- Fireblock (horizontal 2×4 in wall)
- Diagonal bracing
- Insulation packed tight
- Wiring or plumbing in cavity
Solutions:
- Try different angle or entry point
- Create intermediate access hole
- Use stiffer fish rods
- In difficult cases, consider surface-mount raceway instead
Cable Won’t Reach
Problem: Cable not long enough for actual run.
Mistake: Measured point-to-point, didn’t account for routing around obstacles, service loops.
Fix:
- Measure actual route, not straight line
- Add 30% for routing and service loops
- If cable too short, might need extender (HDMI over Cat6 for long runs)
Display Blocks Wall Plate
Problem: Wall plate behind display isn’t accessible after mounting.
Prevention: Use offset wall plate (to side of mount) or low-profile recessed box.
Fix: Might need to relocate wall plate. Plan better next time.
Signal Issues After Installation
Problem: HDMI signal dropping, flickers, or doesn’t work.
Causes:
- Cable too long (HDMI limited to 50 feet passive)
- Cable damaged during pull (sharp bend, pinched)
- Cheap cable not meeting spec
- Interference from power cables
Solutions:
- Use active HDMI cable for long runs
- Test cable before closing walls
- Use quality cables
- Keep HDMI separate from power cables
When experiencing persistent problems, see AV troubleshooting guide.
Best Practices and Pro Tips
Lessons learned from hundreds of installations.
Measure Twice, Cut Once
Classic advice: But seriously. Measure carefully. Double-check stud locations.
Wall plates: Ensure they align with display mounting pattern.
Disaster story: Cut hole 6 inches too high. Now there’s patched hole visible below display.
Future-Proofing
Pull extra cables: HDMI 2.1 today might be obsolete tomorrow. Pull extra Cat6 cables.
Larger conduit: If using conduit, size larger than current needs. Allows future pulls.
Document: Photograph cable routes before closing walls. Mark stud bays on drawing. Future changes much easier.
Service Loops Matter
Always leave extra: Coil 3-6 feet of cable behind wall plates.
Why: Allows re-termination if connector fails. Allows moving connection point slightly if needed.
Where: Behind display, in equipment rack, in wall cavity at access points.
Test Before Finishing
Critical step: Test everything before patching holes or buttoning up.
Checklist:
- All cables work (HDMI signal, network link)
- Display powers on
- Touch panel responds
- No interference or quality issues
Why: Way easier to fix now than after walls closed.
The Bottom Line
Hidden cabling separates professional installations from amateur work. Exposed cables ruin aesthetics and create problems. Proper cable hiding requires planning, the right materials, code compliance, and execution.
In-wall installation is cleanest but requires access and proper rated cables. Surface raceways work when in-wall isn’t possible. Commercial installations need stricter code compliance and coordination with building management.
The investment—whether DIY time or professional installation cost—pays off in clean, professional-looking results that last for years. Displays look like they’re meant to be there, not like they were slapped on the wall with cables dangling.
Take time to plan routes, use proper materials, follow codes, and test before finishing. Your installation will look as good as it functions.